The key to the operation of the X Thruster lies in parameter settings and fine-tuning, based on various conditions: “gasoline, diesel”, “natural aspiration, supercharged”, “duct installation position”, and “engine single cylinder displacement”. By integrating these conditions that affect the parameters, the system parameter values are determined.
If the appropriate parameters cannot be confirmed, phenomena such as “ineffective effect” and “abnormal fuel consumption” will occur, because the engine control has a self-adjustment mechanism in the detection of combustion, and the thruster can also affect the air-fuel ratio adjustment of the engine.
Based on the difference of individual vehicle conditions, after the system completes the initial setting, the power parameters should be fine-tuned based on the engine acceleration response to obtain the best vehicle response.
Due to the nanoscale oxide molecules’ ability to gradually remove existing carbon deposits, it is recommended to drive approximately 3000 kilometers before performing a parameter recalibration to achieve a responsive engine performance.
At any time, you feel that the vehicle is unresponsive or fails to feel the effect of the system, you can try parameter correction.
The power parameter fine-tuning is adjusted in units of 0.1, usually -0.1 is a more likely option.
If you are less sensitive to the engine response, please have the parameter fine-tuning confirmed by the dealer.
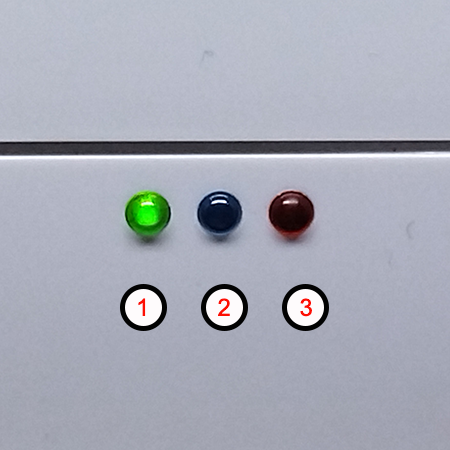
O-01-00
The photo is the indicator light of the controller, and its representative meanings are:
Attention:
The following is the operation demonstration of XThruster® Android mobile application, you can learn how to set the parameters of the system through this video.
O-02-00
The video on the left explains how the XThruster® app works:
Attention:
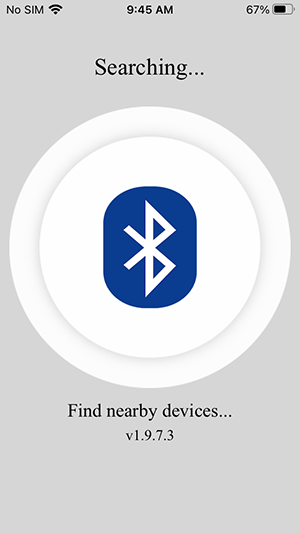
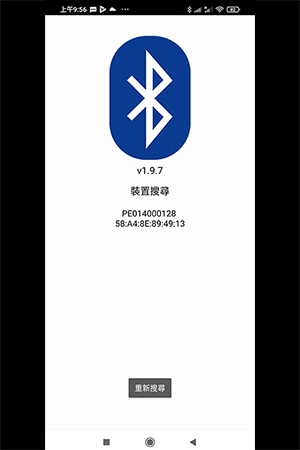
O-03-00
Search device
After confirming that the thruster system hardware is installed and connected to the power supply, open the XThruster® App on your mobile phone, and the control program will start searching for the nearest thruster control unit.
Please remember to turn on the Bluetooth function of your phone.
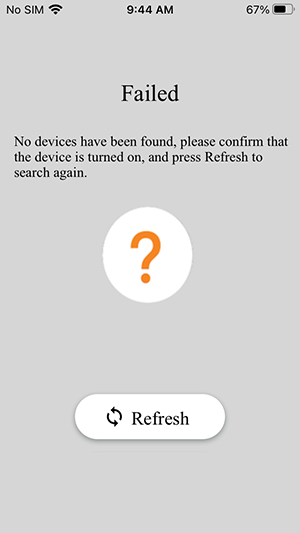
O-03-01
Failed to connect to the device, failed to find the control unit correctly
If the phone cannot find the system control unit, press “Refresh” to continue searching for the system control unit.
Possible reasons for connection failure:
System hardware not powered? Make sure the “Green LED” on the controller is “Constantly on“.
System bluetooth crashes? Certain reasons may cause the Bluetooth of the controller to crash. Please make sure that the “Blue LED” on the controller is “Flashing“. If the “Blue LED” is “Constantly on“, it means that the Bluetooth system has been connected, or machine crashes, disconnect the fuse of the control unit and then reconnect the power to reset the control unit.
Some certain metallic glass heat shields may interfere with Bluetooth communication.
The control unit is too far away, or is blocked by metal, which may affect the communication between the controller and the mobile phone.
If necessary, delete the Bluetooth pairing record of the controller in the phone and pair it again. Or restart the phone and search for the control unit again.
O-03-02
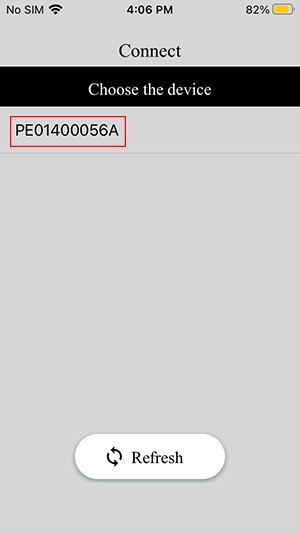
The control unit has been found.
If there is no other system control unit near the mobile phone, the device number in the “red column” on the mobile phone screen, such as “PE01400056A” shown in the picture, means that the control unit has been searched by the app.
Click the “red column” area to switch to the login page.
O-04-00
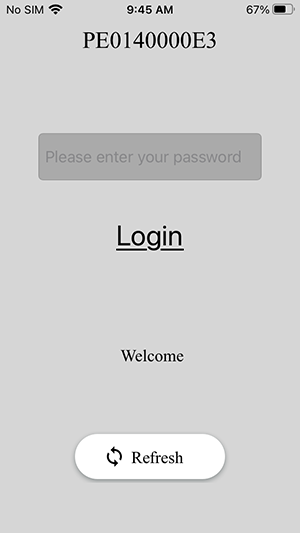
Login to the control unit
After confirming that the control unit is paired with the mobile phone Bluetooth, the XThruster® App, the control program will enter the system login screen.
O-04-01
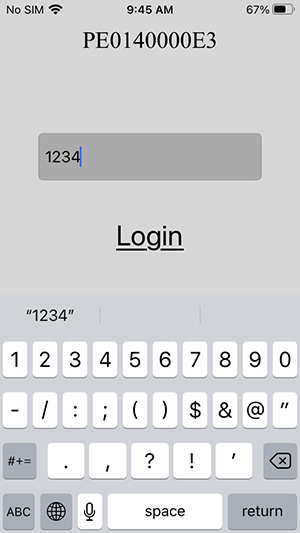
Enter password
The initial password of the control unit is: “1234“.
After entering the password, click “Login” to switch to the system information screen.
The login password can be changed in the “Options List” of the system.
Please keep in mind the changed password. The system does not provide a password reset function. If you lose your password, you will no longer be able to log in to the system to modify any parameters. Even a dealer can’t restore the original password in a repair way! ! !
The out-of-control unit with lost password will also lose the warranty rights.
O-05-00
System screen
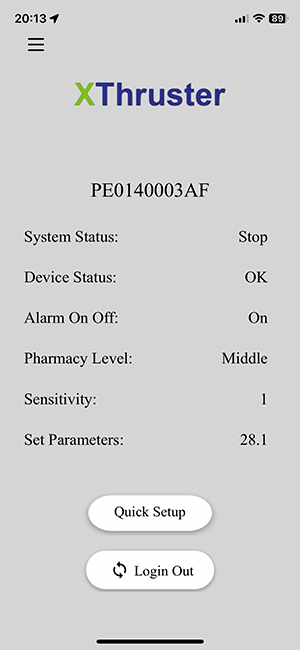
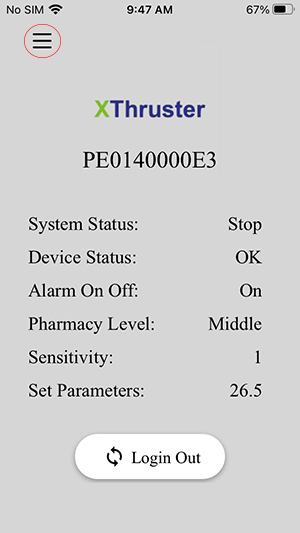
After logging into the system correctly, the system information is as follows:
“System Status“: “Stop” or “Start“, the controller senses the engine vibration and determines whether the system is started or in a sleep state (stop).
“Device Status“: “OK” or “Error“, if there is an abnormality in the system, the error and fault code will be displayed.
For example: “Error 13“, the reaction tank cannot communicate with the controller.
“Alarm On Off“: “On” or “Off“, the warning sound of the control unit is faulty, and the error warning sound of the control unit can be set to turn on or off.
“Pharmacy Level“: “High“, “Medium“, “Low“, it shows the catalyst stock in the reaction tank. Due to the shaking of the vehicle during driving, this information can only be used as a reference. The actual measurement should still directly check the reaction tank gauge .
“Sensitivity“: “1 ~ 9“, adjustable engine vibration sensitivity detection, “1” is the most sensitive.
“Set Parameter“: Please set the parameter according to the recommended value, and fine-tune it through the actual road test.
“Quick Setup“: Allows for quick configuration of power parameters based on vehicle engine specifications and installation method.
“Login Out“: Cut off the connection between the control unit and the mobile phone. After the system completes the setting, it will continue to work according to the setting content, and there is no need to continuously connect to the mobile phone.
O-05-01
Set the sensitivity
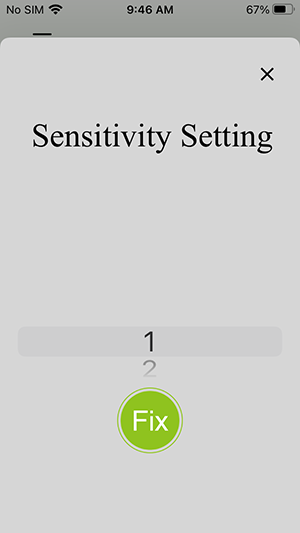
Click the “Value” of “Sensitivity” to switch to the setting screen:
“Sensitivity“: “1 ~ 9“, the adjustable engine vibration sensitivity, “1” is the most sensitive, and the most rapid response to the vibration after the engine is started.
The system control unit is activated according to the vibration after the engine is started. There is a vibration sensor inside, and the recommended value is “1“.
“Modify“: After sliding the value to select the setting value, press “Fix” to save the new parameter into the control unit.
Whether the connection with the mobile phone is cut off, the system is powered off, the battery is replaced, etc., the parameters that have been set will continue to exist until the next modification.
O-05-02
Setting parameters and fine-tuning
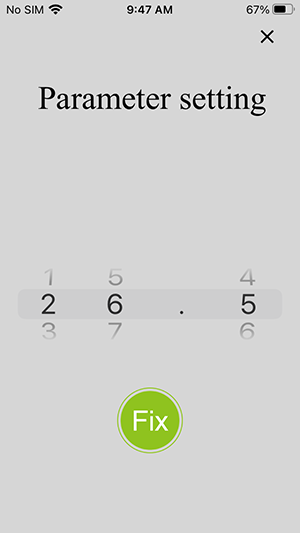
Click “Value” of “Set Parameters“」switch to the setting screen:
“Set Parameter“: “26.5” or other values are the basic definition of the single-cylinder displacement from the engine, such as an 8-cylinder engine with a displacement of 4000 cc, which is a single-cylinder 500 cc engine, combined with other factors consider, fuel type, air intake method, system installation position, etc., and set the corresponding power parameters。
“Quick Setup” enables the calculation of basic configuration values for Set Parameters.
System parameter fine-tuning, with 0.1 as the adjustment unit.
After the system is activated, you can periodically reconfirm whether the “Parameters” need to be fine-tuned.
“Modify“:After sliding the value to select the setting value, press “Fix” to save the new parameter into the control unit.
Whether the connection with the mobile phone is cut off, the system is powered off, the battery is replaced, etc., the parameters that have been set will continue to exist until the next modification.
For the fine-tuning of parameters, the probability of down-modification is relatively high, please make fine-tuning in units of -0.1.
On some diesel engines, if there is black smoke emission, you can try to fine-tune the parameter +0.1 to see if the amount of black smoke is reduced?
If the fine-tuning of the parameters does not obtain better results, please return to the last optimal value.
O-05-03
Quickly set up the parameters.
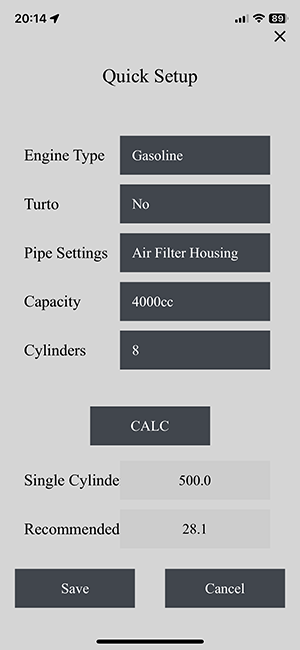
Clicking on “Quick Setup“ will switch to the quick setup screen. Please adjust the options based on the vehicle’s condition.
“Engine Type“: “Gasoline” or “Diesel“.
「Turbo」:「Yes」or「No」。
「Pipe Setting」:「Air Filter Housing」or「Intake Pipe」。
「Capacity」:Manually enter the engine displacement.。
「Cylubders」:Manually enter the number of engine cylinders.。
“Calculate“: After ensuring the above conditions are set, pressing “Calculate” will provide the “Single Cylinder” and “Recommended Parameters” below. These values are calculated based on the selected conditions mentioned above.
“Save“: Save and apply the parameters calculated after the “Calculate” step.
After completing the quick setup, it is still necessary to confirm whether any fine-tuning of the Set Parameters is required by testing the vehicle on actual roads.
If fine-tuning the parameters does not yield better results, please revert back to the values calculated in the quick setup.
O-06-01
Add License plate number
On the system information screen, click “Options List” in the red circle at the top leftYou can switch to the next page of the setting screen.
O-06-02
Replace Device Name to License plate number of Vehicle
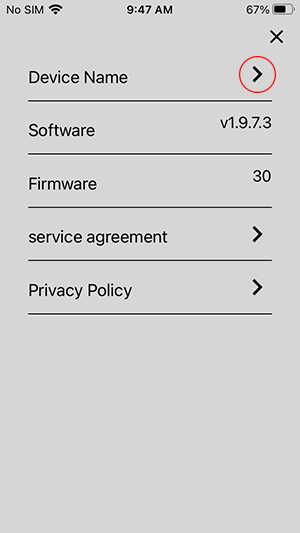
On the next page of the setting screen, click the arrow in the red circle on the right side of “Device Name“,You can switch to the device name screen sub-page.
O-06-03
Replace Device Name to License plate number of Vehicle
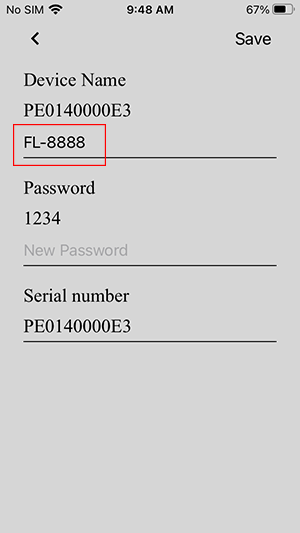
After entering the screen, enter the vehicle number under “Device Name” to help identify。
In a very common case, there may be more than one vehicle in your garage or service facility equipped with XThruster® thrusters. To avoid connecting the wrong vehicle, it is recommended to replace the device name with the vehicle number to prevent errors.
“Serial number“: “PE0140000E3” is the serial number of the control unit, which is required for warranty registration. Please capture the screen and send it to the dealer for warranty registration.
“Save“: After entering the vehicle number, press “Save” at the top right of the screen to save the vehicle number into the control unit.
Whether the connection with the mobile phone is cut off, the system is powered off, the battery is replaced, etc., the parameters that have been set will continue to exist until the next modification.
After logging out of the system, search for the system control unit again, the system will display the vehicle number.
O-06-04
Complete setup
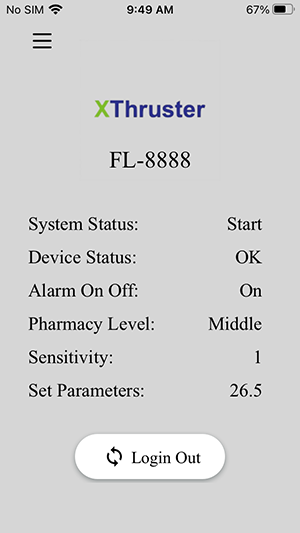
After all the settings are completed, the screen will appear as shown in the figure.。(Please remember to log out of the system)
“System Status“: “Start” means that the system device has sensed the vibration after the engine is started and started to work.
Usually, except for the initial setting, or the fine-tuning of parameters required for the first driving of about 3000 km, it is usually not necessary to connect the control unit.
The thrusters will start working every time the engine is started, and automatically go to sleep when the engine is turned off.
Other than checking the catalyst stock by mileage recommendations, and replenishing the catalyst, the system does not require special maintenance. We recommend checking the reaction tank for catalyst replenishment every 1,000 liters of gasoline, or 2,000 liters of diesel fuel.
Contact our dealer to purchase XThruster® catalysts.
With XThruster® Thrusters, you get the best combustion efficiency, the lowest pollution emissions, and the most agile engine performance for driving pleasure.
For any technical problems, please contact your local dealer for assistance.
You can also contact us to share your experience publicly.
O-06-05
System error
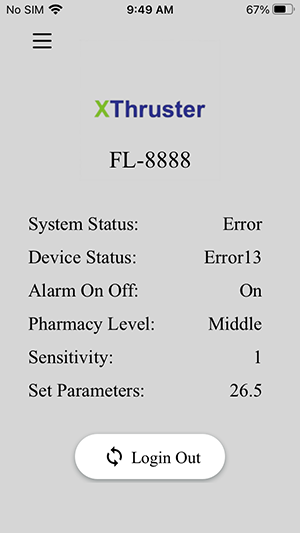
Common system failures, the screen will appear as shown.
“System Status“: “Error” means that the system device is in a fault state and stops working.
“Device Status“: “Error 13” means that the system control unit cannot control the reactor tank.
Simple Troubleshooting:
Please try to unplug the reaction tank cable connector on the control unit, first unplug it and then plug it back into the control unit to see if the “Device Status” shows “OK“?
If the fault condition is not resolved, it means that the reaction tank is out of control, please contact the dealer for assistance.
If the fault state persists, the fuse of the control unit can be cut off. Do not attempt to disassemble the reaction tank by yourself.